Automation Node
The Automation Node has been enhanced with two levels of autonomy based on your automation needs. Following are the two options: Orchestrated Autonomy and Full Autonomy.
Orchestrated Autonomy
Structured conversation flows powered by DialogGPT’s intent identification expand the app’s Dynamic Routing capabilities, allowing you to link multiple automation apps to streamline orchestration.
Parent App and Linked Apps
- The Parent App independently manages its own dialogs, FAQs, and Knowledge base and orchestrates the dialogs and FAQs of its linked apps. It uses DialogGPT to dynamically route user input to the appropriate linked app based on detected intents.
- Linked Apps are the apps connected to the parent app. They contribute their dialogs and FAQs to support the parent app's intent resolution and orchestration.
App Indexes
The Dynamic Routing maintains two key indexes:
- Configured App Index: This index represents the app's in-development version. It is created when apps are first linked and updated using "Sync Updates" after making changes.
- Published App Index: It represents the live, user-facing version of the app. It is created when the parent app is published and automatically updated when linked apps are published.
Full Autonomy
Agent Platform-powered automation that independently handles entire conversation flows, adapting to situations without predefined paths. This flow leverages Agentic Apps to dynamically understand, plan, and execute actions based on user queries without relying on defined workflows. It intelligently manages context, retrieves relevant information, and orchestrates multi-step tasks to deliver accurate and personalized responses. Learn More.
Configure Automation Node
General Settings
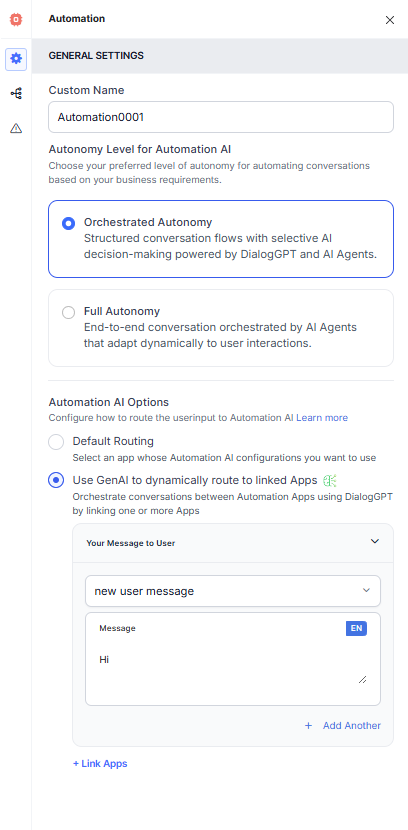
Enter the name for the automation node and select a conversation management approach.

Autonomy Level for Automation AI
Select how you want to handle user conversations based on your business needs and process complexity.
Orchestrated Autonomy: Structured conversation flows powered by DialogGPT’s intent identification expand the app’s Dynamic Routing capabilities, allowing you to link multiple automation apps to streamline orchestration.
Automation AI Options
- Default Routing: Select an app whose Automation AI configurations you want to use.
- Run based on User Input: Select this option to take a user input and let the /node-types/automation decide what to do based on the intent recognized in the user utterance.
- Your Message to User: The message that will be displayed to the customer. Select the message type from the drop-down list and type your message. Click + Add Another to add another message.
- Run a Specific Dialog: Select this option to run a specific dialog. The selected dialog will be executed when this node is triggered. Click the Dialog dropdown to select a dialog.
- Run based on User Input: Select this option to take a user input and let the /node-types/automation decide what to do based on the intent recognized in the user utterance.
- Use GenAI to dynamically route to linked apps: Use the Message Prompt and Link Apps.
Full Autonomy: Enable Agent Platform-powered automation that independently handles entire conversation flows, adapting to situations without predefined paths.
Agentic App Configurations
-
Agentic App: Select an existing Agentic App or create a new one tailored to your specific needs. For more information, see Create an Agentic App.
-
Environment: Select the appropriate environment where your app will be deployed. This setting applies only to the execution after the flow is published. The environment must be created within the Agentic App.
Warning
Real-time Voice Interactions and TTS Streaming are mutually exclusive features; enabling one will automatically disable the other. By default, both are disabled. When neither feature is enabled, the system defaults to operating in non-streaming mode.
-
Real-time Voice Interactions: Enable Real-time Voice Interactions powered by multi-modal language models for seamless, low-latency, and context-aware conversations. This feature allows users to engage in two-way voice streaming through the Voice Gateway, enhancing automation with AI models. When real-time voice interaction is enabled, Kore Voice Gateway uses the underlying models configured in Agent Platform to add voice capabilities to the application. You can also enable Real-time Voice Interactions later from the Agent Platform.
-
TTS Streaming: TTS Streaming sends LLM responses to TTS for real-time audio playback, supporting only Deepgram TTS and ElevenLabs TTS.

Connection Rules
Define the connection rule for the success or failure of the first dialog and the Agent Transfer.

- On Success of First Dialog:
- Continue Automation until completion: Choose the node from the drop-down list to which you want to direct the flow.
- Exit Automation: Choose the node from the drop-down list to which you want to direct the flow.
- On Failure of First Dialog:
- Let Automation handle until completion: Choose the node from the drop-down list to which you want to direct the flow.
- Exit Automation: Choose the node from the drop-down list to which you want to direct the flow.
- On Agent Transfer: If automation has been handed off for agent transfer, select the node from the drop-down list to which you want to direct the flow.
Error Handling
Use this section to handle system errors during customer interactions.

- Your Message to User: The message that will be displayed to the customer. Select the message type from the drop-down list and type your message. Click + Add Another to add another message.
- Go to node: Select the node to which you want to direct the error-handling flow and define the system behavior.